

Delphi - Snelstart gids Delphi .NET Compact Framework, deel II
- Datum:
- Auteur: Stefan Cruysberghs
- Deze pagina is enkel in het Engels beschikbaar
My more recent and longer article "Developing Pocket PC applications with Delphi 2006" has been published on the CodeGear (Borland) Community website on July 5th 2006. It also describes the new Windows Mobile emulators, how using the CFBH tool and the Oosterkamp Class Helpers and how to deploy a Pocket PC application with the CAB Wizard. http://dn.codegear.com/article/33507 |
Borland has recently released a preview version of a Delphi for .NET CF compiler. The preview of this compiler can be used by Delphi developers in exploring the world of the .NET Compact Framework on Pocket PCs or Smartphones. After reading the Quickstart Guide of David Clegg (http://bdn.borland.com/article/0,1410,33066,00.html) I started creating some small test projects. In this article, which is a continuation of the article of David Clegg, I will describe some of my experiences. Hopefully this can be useful for other Delphi developers.
- .NET Compact Framework
- Windows CE emulator
- System.Windows.Forms
- Microsoft.WindowsCE.Forms
- System.IO
- System.Data
- Conclusion
.NET Compact Framework
Pocket PCs and other devices running Windows CE are the devices that currently support the .NET Compact Framework. The .NET Compact Framework is a rich subset of the .NET Framework, thus providing the same benefits as the .NET Framework. The .NET CF has also a few additional libraries that are specific to mobility and device development.
But, not all properties, methods and classes which are available on the full .NET Framework have been implemented on the Compact Framework. In this article I will show the most important differences and some workarounds.
Windows CE emulator
Downloads
Before starting you need to download and install the .NET Compact Framework, the Windows CE emulator and some SDK's.
Emulator images and the SDK installations which are required
- SDK Windows Mobile 2003 Pocket PC (custom install, uncheck the Visual C++ code samples)
- Emulator Image Windows Mobile 2003 SE Pocket PC
Windows CE emulator to test Windows Mobile for Pocket PC and Smartphone on your PC
.NET Compact Framework assemblies
These assemblies are already included in the Emulator Images but you need to install them on your PocketPC (and on your PC).
Startup parameters for emulator
| ceimage | Link to emulator image file (Pocket PC or Smartphone) |
| sharedfolder | Link to shared folder with your own applications. On the Pocket PC this folder can be accessed by the Storage Card link. |
| video | Resolution (width x height) and bit depth. 240x320x16 for Pocket PC's, 176x220x16 for Smartphones |
| ethernet | Specifies the level of networking support in the Emulator (none, shared, virtualswitch) |
| skin | Link to a XML skin file which will show a bitmap of a Pocket PC or Smartphone around the Windows CE window. This parameter is not required. |
VBScripts to start the emulator
TestPocketPC.vbs
Dim WshShell
Set WshShell = CreateObject("WScript.Shell")

q = Chr(34)
strCommandLine = q & "C:\Program Files\Windows CE 5.0 Emulator\Emulator_500.exe" & q
  & " /ceimage " & q & "C:\Program Files\Windows CE Tools\wce420\POCKET PC 2003\Emulation\PPC_2003_WWE.bin" & q
  & " /sharedfolder " & q & "C:\CFNET" & q
  & " /video 240x320x16"
  & " /ethernet shared"
  & " /skin " & q & "C:\Program Files\Windows CE Tools\wce420\POCKET PC 2003\Emulation\Pocket_PC_Emulator_Skin.xml" & q

WshShell.Exec(strCommandLine)Dim WshShell
Set WshShell = CreateObject("WScript.Shell")
q = Chr(34)
strCommandLine = q & "C:\Program Files\Windows CE 5.0 Emulator\Emulator_500.exe" & q
& " /ceimage " & q & "C:\Program Files\Windows CE Tools\wce420\SMARTPHONE 2003\Emulation\SP_2003_WWE.bin" & q
& " /sharedfolder " & q & "C:\CFNET" & q
& " /video 176x220x16"
& " /ethernet shared"
& " /skin " & q & "C:\Program Files\Windows CE Tools\wce420\SMARTPHONE 2003\Emulation\Smartphone_Emulator_Skin.xml" & q
WshShell.Exec(strCommandLine)Remove the enters in the command line rule because this should be one source line !
Delphi 2005
In Delphi 2005 you have to start with a Windows Forms .NET application. Afterwards this application will be compiled with the Delphi .NET CF compiler (DCCIL). You can use the batch file which is shown in the article of David Clegg to compile your application. Or you can use the VBScript which is shown in my article "Configure tools menu with VB scripts". This VBScript will compile the application and show the logfile in the Delphi IDE.
System.Windows.Forms
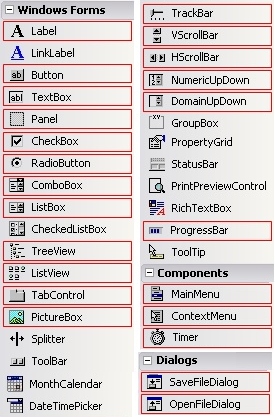 |
Undeclared identifier errorsI have tested most components of the Windows Forms, Components and Dialogs component palette. The components marked with a red rectangle are available in the .NET Compact Framework. You can also take a look at the online Microsoft Class Library Reference for the .NET Framework. At the bottom of most pages you will find the platform requirements. These marked classes do exist, but not all their properties and methods are implemented on the NET CF. Because we are using a WinForms designer which targets the full .NET Framework, some properties specific for .NET framework were generated in the InitializeComponent section. When compiling, the .NET CF compiler will give a lot of Undeclared identifier errors. When a class is undeclared, you have to remove it from the form (or in your source code). When properties or methods are not available, you have to remove the line in your source code. One of the errors which will be returned by the .NET CF compiler is Undeclared identifier "TabIndex". The TabIndex property does not exist in the .NET CF. Tabbing is based on z-order, the order in which the controls have been added to the Controls collection of the form. The first focusable control in a PocketPC application is the mainform itself. |
Other properties and methods which should be deleted in the InitializeComponent method of the form (Windows Form Designer generated code) are :
- Name
- TabIndex
- TabStop
- Index
- AutoScaleBaseSize
- ResumeLayout
- SuspendLayout
- AddRange
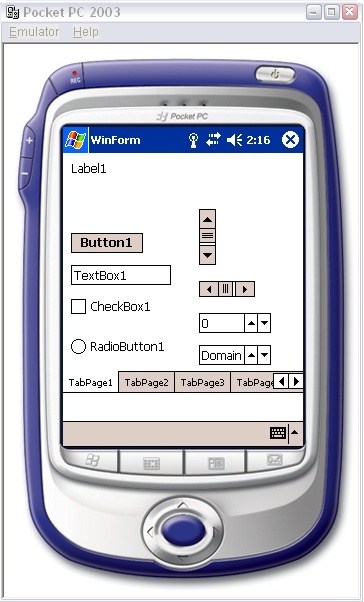
After solving all undeclared identifier errors, you can start the Windows CE emulator and test the executable. When the .NET CF is installed on your PocketPC, you can also copy the EXE to your PocketPC and run it.
Forms
On a PocketPC, top-level forms with a border are always shown full screen and they can not be moved or resized. So it is better setting the Size property in design-time; Width=240; Height=320. In run-time the Size en Location properties will be ignored.
In order to display a non-full screen form on a PocketPC, you should set the form's FormBorderStyle property to FormBorderStyle.None. The position of the close button is still in the right top corner.
The StartPosition property which can be used to set a form in the screen center, is not supported in the .NET CF. But this can be solved easily by calculating the center of the screen in the Load event of the form.
procedure TWinForm1.TWinForm1_Load(sender: System.Object; e: System.EventArgs);
begin
  Self.Location := System.Drawing.Point.Create(
    (Screen.PrimaryScreen.Bounds.Width - Self.Width) div 2,
    (Screen.PrimaryScreen.Bounds.Height - Self.Height) div 2);
end;
PocketPC applications normally remain running indefinitely to allow users to quickly switch between applications. So, a PocketPC application does not close, instead it minimizes. When the form property MinimizeBox is True (default), a "smart minimize" X-button will be displayed in the top right, whereas MinimizeBox=False will show a little close OK-button.
| MinimizeBox=True | Minimize | |
| MinimizeBox=False | Close |
When you like to know when a window is being minimized, use the Deactivate event.
Application
Most properties of the Application class which you can use in .NET are not implemented in the .NET CF. So properties like CommonAppDataPath, ExecutablePath, CompanyName, ProductName, ProductVersion, ... are not available.
Another way to get the path of the executable is to access the FullyQualifiedName property of the first module of the assembly. For accessing the Assembly object you have to add the System.Reflection namespace. File IO functions are included in the System.IO namespace.
uses
  ..., System.Reflection, System.IO;

strExecutableFullName := System.Reflection.Assembly.GetExecutingAssembly.GetModules[0].FullyQualifiedName;
strExecutableName := System.IO.Path.GetFileName(strExecutableFullName);
strExecutablePath := System.IO.Path.GetDirectoryName(strExecutableFullName);
The AssemblyVersion (=ProductVersion) is specified in the project file. In a PocketPC application this version number can be accessed by using the GetName.Version property of the assembly.
[assembly: AssemblyVersion('1.2.0.0')]strProductVersion := System.Reflection.Assembly.GetExecutingAssembly.GetName.Version.ToString;
Menu
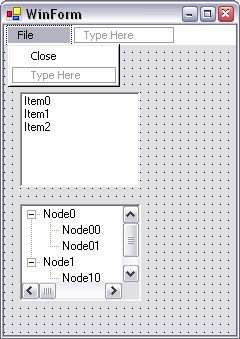
When creating menus or items for listboxes or treeviews in design-time, you will get undeclared identifier errors on the AddRange method. This can be solved easily by replacing these lines by using the Add method. On a PocketPC the mainmenu will be shown at the bottom of the screen.
Self.MainMenu1.MenuItems.AddRange(TArrayOfSystem_Windows_Forms_MenuItem.Create(Self.MenuItemFile));
Self.MenuItemFile.MenuItems.AddRange(TArrayOfSystem_Windows_Forms_MenuItem.Create(Self.MenuItemClose));
Self.MainMenu1.MenuItems.Add(Self.MenuItemFile);
Self.MenuItemFile.MenuItems.Add(Self.MenuItemClose);
ListBox
For listbox items you have to do the same.
Self.ListBox1.Items.AddRange(TArrayOfSystem_Object.Create('Item0', 'Item1', 'Item2'));Self.ListBox1.Items.Add('Item0');
Self.ListBox1.Items.Add('Item1');
Self.ListBox1.Items.Add('Item2');
TreeView
The AddRange method of the Nodes class has to be replaced by Insert statements for each node.
Self.TreeView1.Nodes.AddRange(TArrayOfSystem_Windows_Forms_TreeNode.Create(
  System.Windows.Forms.TreeNode.Create('Node0',
  TArrayOfSystem_Windows_Forms_TreeNode.Create(
  System.Windows.Forms.TreeNode.Create('Node00'),
  System.Windows.Forms.TreeNode.Create('Node01'))),
  System.Windows.Forms.TreeNode.Create('Node1',
  TArrayOfSystem_Windows_Forms_TreeNode.Create(
  System.Windows.Forms.TreeNode.Create('Node10')))));
Self.TreeView1.Nodes.Insert(0,System.Windows.Forms.TreeNode.Create('Node0'));
Self.TreeView1.Nodes.Item[0].Nodes.Insert(0,System.Windows.Forms.TreeNode.Create('Node00'));
Self.TreeView1.Nodes.Item[0].Nodes.Insert(1,System.Windows.Forms.TreeNode.Create('Node01'));
Self.TreeView1.Nodes.Insert(1,System.Windows.Forms.TreeNode.Create('Node1'));
Self.TreeView1.Nodes.Item[1].Nodes.Insert(0,System.Windows.Forms.TreeNode.Create('Node10'));
PictureBox
When opening an image in a PictureBox in design-time, this image will be stored in a XML based resource file (.RESX).
<data name="PictureBox1.Image" type="System.Drawing.Bitmap, System.Drawing,
  Version=1.0.5000.0, Culture=neutral, PublicKeyToken=b03f5f7f11d50a3a"
	mimetype="application/x-microsoft.net.object.bytearray.base64">
  <value>
    Qk3OOgAAAAAAADYAAAAoAAAAZAAAADIAAAABABgAAAAAAAAAAADEDgAAxA4AAAAAAAAAAAAA49/g49/g
    49/g49/g49/g49/g49/g49/g49/g49/g49/g49/g49/g49/g49/g49/g49/g49/g49/g49/g49/g49/g
    ...
  </value>
</data>{$R 'MainForm.TWinForm.resources' 'MainForm.resx'}In the InitializeComponent method of the form, a ResourceManager object will be created and with the GetObject method the resources can be accessed.
var
  resources: System.Resources.ResourceManager;
begin
  resources := System.Resources.ResourceManager.Create(TypeOf('TWinForm'));
  Self.PictureBox1.Image := (System.Drawing.Image(resources.GetObject('PictureBox1.Image')));
end;
This works fine in a .NET application and it will also compile in a .NET CF application. But when running the EXE in the emulator or on your PocketPC, you will get a MissingManifestResourceException error. I tried several things but I did not find a way to solve this problem with the Resource Manager.
So I found two other ways to show an image :
The first way is to load a bitmap from file. This can be done by specifying the image filename in the Create method of the Bitmap class. After creating the bitmap, this object can be assigned to the Image property of the PictureBox.
var
  objBitmap : System.Drawing.Bitmap;
  strExecutablePath : String;
begin
  strExecutablePath := Path.GetDirectoryName(Assembly.GetExecutingAssembly.GetModules()[0].FullyQualifiedName);
  objBitmap := Bitmap.Create(strExecutablePath+'\MyBitmap.bmp');
  Self.PictureBox1.Image := objBitmap;
end;
It is also possible to include a bitmap into your EXE. In stead of using a resource file, you have to include a bitmap into your project file by using the $R compiler directive. The same can be done by clicking on the "Add to project" menu item.
First you have to create a Stream object and read the bitmap into this stream with the GetManifestResourceStream method of the Assembly. Then you can create a Bitmap object and pass the stream as a create-parameter.
{$R 'MyBitmap.bmp' 'MyBitmap.bmp'}


var
  objStream: System.IO.Stream;
  objBitmap : System.Drawing.Bitmap;
begin
  objStream := Self.GetType.Assembly.GetManifestResourceStream('MyBitmap.bmp');
  objBitmap := Bitmap.Create(objStream);
  Self.PictureBox1.Image := objBitmap;
end;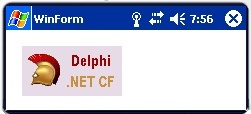
MessageBox
When you take a look at the Microsoft .NET Class Library you will see that the .NET MessageBox class supports 12 overloaded Show methods. In the .NET Compact Framework only 3 of them are implemented. If you try another one, the compiler will give an error :
Error: E2250 There is no overloaded version of 'Show' that can be called with these argumentsMessageBox.Show('Message', 'Caption', MessageBoxButtons.OK, MessageBoxIcon.Exclamation, MessageBoxDefaultButton.Button1);
MessageBox.Show('Message', 'Caption');
MessageBox.Show('Message');
Timer
After dropping a Timer component on your form in design-time, you only have to change the Create method in the InitializeComponent procedure. The container-parameter should be removed.procedure TWinForm1.InitializeComponent;
begin
Self.Timer1 := System.Windows.Forms.Timer.Create; //(Self.components);
Self.Timer1.Enabled := True;
Self.Timer1.Interval := 1000;
Include(Self.Timer1.Tick, Self.Timer1_Tick);
end;
procedure TWinForm1.Timer1_Tick(sender: System.Object; e: System.EventArgs);
begin
Text := DateTime.Now.ToString;
end;
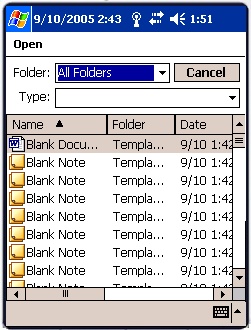
OpenFileDialog & SaveFileDialog
The OpenFileDialog and SaveFileDialog are also supported in the .NET Compact Framework. But, the OpenFileDialog is restricted to the "My Documents" folder. Apparently this restriction is imposed by the operating system to help users to organize their files under the standard "My Documents" folders.
Microsoft.WindowsCE.Forms
There are also some classes which are exclusive to the .NET Compact Framework. They are included in the System.Net.Sockets, System.Data.SqlServerCE and Microsoft.WindowsCE.Forms namespaces.
Install .NET CF assemblies
Before you can employ them in Delphi, these .NET CF assemblies should be available on your PC. There are two ways to copy these DLL's to your PC :
- Install the .NET Compact Framework on your PocketPC
- Copy all GAC_ DLL's from the global assembly cache at your PocketPC to your PC
- Execute this batch file which will rename the GAC DLL's
ConvertGAC.bat
copy GAC_Microsoft.VisualBasic_v7_0_5000_0_cneutral_1.dll microsoft.visualbasic.dll
copy GAC_Microsoft.WindowsCE.Forms_v1_0_5000_0_cneutral_1.dll microsoft.windowsce.forms.dll
copy GAC_mscorlib_v1_0_5000_0_cneutral_1.dll mscorlib.dll
copy GAC_System.Data_v1_0_5000_0_cneutral_1.dll system.data.dll
copy GAC_System.Drawing_v1_0_5000_0_cneutral_1.dll system.drawing.dll
copy GAC_System.Net.IrDA_v1_0_5000_0_cneutral_1.dll system.net.irda.dll
copy GAC_System.Web.Services_v1_0_5000_0_cneutral_1.dll system.web.services.dll
copy GAC_System.Windows.Forms.DataGrid_v1_0_5000_0_cneutral_1.dll system.windows.forms.datagrid.dll
copy GAC_System.Windows.Forms_v1_0_5000_0_cneutral_1.dll system.windows.forms.dll
copy GAC_System.Xml_v1_0_5000_0_cneutral_1.dll system.xml.dll
copy GAC_System_v1_0_5000_0_cneutral_1.dll system.dll
pause- Extract all files in netcf.core.ppc3.ARM.cab (=installation files of .NET Compact Framework)
- Execute this batch file which will rename and delete the files
ConvertCAB.bat
del NE8A18~1.000
del 0mscoree.001
del MSCORE~1.002
del cgacutil.003
del NETCF1~1.004
del NETCFA~1.005
del CALEND~1.006
del CHARIN~1.007
del CULTUR~1.008
del CULTUR~2.009
del REGION~1.010
ren mscorlib.011 mscorlib.dll
ren 00system.012 system.dll
ren SYSTEM~3.013 system.drawing.dll
ren SYC6B2~1.014 system.web.services.dll
ren SYSTEM~4.015 system.windows.forms.dll
ren SY9B57~1.016 system.windows.forms.datagrid.dll
ren SY40C7~1.017 system.xml.dll
ren SYSTEM~1.018 system.net.irda.dll
ren SY4317~1.019 system.data.dll
ren MICROS~2.021 microsoft.visualbasic.dll
ren MICROS~3.020 microsoft.windowsce.forms.dll
del NETCF_~1.999
pause
When compiling/linking a project which uses classes from the Microsoft.WindowsCE.Forms (or System.Windows.Forms.Datagrid) assembly, you have to refer to this assembly by using the -lu parameter of DCCIL compiler. So change the batch file which compiles your .NET CF projects or your use my VBScript which already refers to this assemby.
-lu"C:\NETCFAssemblies\Microsoft.WindowsCE.Forms.dll"
InputPanel
The Microsoft.WindowsCE.Forms assembly contains 3 classes; InputPanel, Message, MessageWindow. The InputPanel provides programmatic control of the SIP (soft input panel) on Pocket PCs.
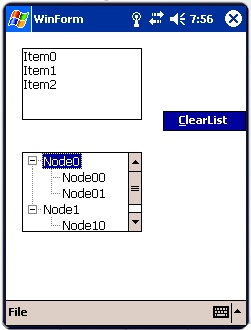
The SIP can be activated from the PocketPC taskbar. In .NET CF-based applications, the taskbar is visible only if the active form has an associated mainmenu. When adding a MainMenu to your form, the SIP will automatically be visible when running the EXE without creating it yourself. So the user of the PocketPC has access to this virtual keyboard to fill in textboxes or other input controls.
When you like to have control of the SIP and popup it when a control gets focused, you have to create a InputPanel object. Therefore you have to add Microsoft.WindowsCE.Forms to the uses of your form. In the GotFocus and LostFocus events of a textbox you can enable (popup) or disable the SIP.
uses
  ..., Microsoft.WindowsCE.Forms;

procedure TWinForm.InitializeComponent;
begin
  MainMenu1 := System.Windows.Forms.MainMenu.Create;
  Self.Menu := MainMenu1;

  Self.InputPanelMain := Microsoft.WindowsCE.Forms.InputPanel.Create;

  Self.TextBox1 := System.Windows.Forms.TextBox.Create;
  Include(TextBox1.GotFocus, TextBox1_GotFocus);
  Include(TextBox1.LostFocus, TextBox1_LostFocus);
end;

procedure TWinForm.TextBox1_GotFocus(Sender: TObject; Args: System.EventArgs);
begin
  InputPanelMain.Enabled := True;
end;

procedure TWinForm.TextBox1_LostFocus(Sender: TObject; Args: System.EventArgs);
begin
  InputPanelMain.Enabled := False;
end;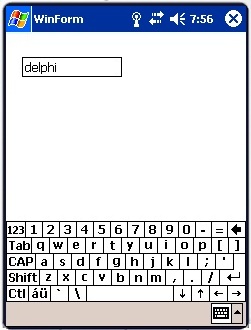
The EnabledChanged event occurs whenever the SIP is enabled or disabled, either by the user or programmatically. You can use this event to change the layout of the form by moving or resizing some controls. To get the SIP's size, you can access the Bounds property. To determine the size of the form area not occupied by the SIP you have to use the VisibleDesktop property.
The Bounds property always returns a width of 240 pixels and a height of 80 pixels for Pocket PCs, regardless of whether or not the SIP is enabled. If the SIP is disabled, you have to take in account that the mainmenu has a height of 26 pixels.
An example of how to place a textbox at the bottom of the screen :
procedure TWinForm.InitializeComponent;
begin
  Self.InputPanelMain := Microsoft.WindowsCE.Forms.InputPanel.Create;
  Include(InputPanelMain.EnabledChanged, InputPanelMain_EnabledChanged);
end;

procedure TWinForm.InputPanelMain_EnabledChanged(Sender: TObject; Args: System.EventArgs);
begin
  if InputPanelMain.Enabled then
    Self.TextBox1.Top := InputPanelMain.VisibleDesktop.Height - Self.TextBox1.Height - 2
  else
    Self.TextBox1.Top := InputPanelMain.VisibleDesktop.Height - Self.TextBox1.Height - 26 - 2;
end;
System.IO
This is a small example of how to use some of the System.IO functions and classes. This procedure will retrieve some system information (path, version, file size, creation time, ...) about the executable.
var
  objFileInfo : System.IO.FileInfo;
  strExecutableFullName : String;
  strExecutableName : String;
  strExecutablePath : String;
  strProductVersion : String;
  intFileSize : Integer;
  strFileCreationTime : String;
begin
  strExecutableFullName := System.Reflection.Assembly.GetExecutingAssembly.GetModules[0].FullyQualifiedName;
  strExecutableName := System.IO.Path.GetFileName(strExecutableFullName);
  strExecutablePath := System.IO.Path.GetDirectoryName(strExecutableFullName);
  strProductVersion := System.Reflection.Assembly.GetExecutingAssembly.GetName.Version.ToString;

  objFileInfo := System.IO.FileInfo.Create(strExecutableFullName);
  try
    intFileSize := objFileInfo.Length;
    strFileCreationTime := objFileInfo.CreationTime.toString;
    //...
  finally
    objFileInfo.Free;
  end;
end;
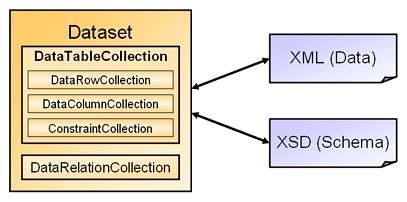
System.Data
Text or INI files and the Windows registry are generally things of the past for .NET applications. XML files are the appropriate way to store data. There is a System.XML namespace with a lot of classes which look quite complicated. Fortunately, there is a very easy way in .NET to solve this; the Dataset class in the System.Data namespace. Delphi developers are undoubtedly familiar with clientdatasets which can store data locally. Well, the Dataset class is also an in memory dataset with almost the same features.
Write and read XML
In this example, I’ll show how you can easily create a dataset (with one table and with an integer Index field and a string Description field), load a XML file and save the dataset contents to a XML file with just a few lines of code.
function TWinForm.GetExecutablePath : String;
begin
  Result := System.IO.Path.GetDirectoryName(
    System.Reflection.Assembly.GetExecutingAssembly.GetModules()[0].FullyQualifiedName);
end;

procedure TWinForm.CreateDataset;
var
  DataTable1: DataTable;
begin
  DataTable1 := Dataset1.Tables.Add('Table1');
  DataTable1.Columns.Add('Index', typeof(Integer));
  DataTable1.Columns.Add('Description', typeof(String));
end;

procedure TWinForm.LoadDataset;
var
  strFileName : String;
begin
  strFileName := GetExecutablePath + '\Dataset.xml';
  if (System.IO.File.Exists(strFileName)) then
    Dataset1.ReadXML(strFileName);
end;

procedure TWinForm.SaveDataset;
begin
  Dataset1.WriteXML(GetExecutablePath + '\Dataset.xml');
end;<?xml version="1.0" standalone="yes"?>
<NewDataSet>
<Table1>
<Index>0</Index>
<Description>Borland</Description>
</Table1>
<Table1>
<Index>10</Index>
<Description>Delphi</Description>
</Table1>
<Table1>
<Index>20</Index>
<Description>.NET CF</Description>
</Table1>
</NewDataSet>
Locate function
If you like to create a kind of 'Locate' function, then you have to use the Find method of the Rows collection. This Find method returns a DataRow object. This method requires that you set the PrimaryKey property of the DataTable before using it. If you don't, you will get an exception.
procedure TWinForm.CreateDataset;
var
  DataTable1: DataTable;
	arrPrimKey : array[0..0] of DataColumn;
begin
  DataTable1 := Dataset1.Tables.Add('Table1');
  DataTable1.Columns.Add('Index', typeof(Integer));
  DataTable1.Columns.Add('Description', typeof(String));

  arrPrimKey[0] := DataTable1.Columns.Item['Index'];
  DataTable1.PrimaryKey := arrPrimKey;
end;

procedure TWinForm.LoadDataset;
var
  strFileName : String;
  arrPrimKey : array[0..0] of DataColumn;
begin
  strFileName := GetExecutablePath + '\Dataset.xml';
  if (System.IO.File.Exists(strFileName)) then
  begin
    Dataset1.ReadXML(strFileName);

    arrPrimKey[0] := Dataset1.Tables.Item['Table1'].Columns.Item['Index'];
    Dataset1.Tables.Item['Table1'].PrimaryKey := arrPrimKey;
  end;
end;

function TWinForm.FindDescription(const aintIndex : Integer) : String;
var
  objRow : DataRow;
begin
  Result := '';
  objRow := Dataset1.Tables.Item['Table1'].Rows.Find(aintIndex);
  if Assigned(objRow) then
    Result := objRow.Item['Description'].ToString;
end;
XSD schema
It is also possible to use the power of ADO.NET. A Dataset and its DataTables have a lot of extra Column and Constraints properties and they can be stored as a XSD schema. The WriteXML method in the .NET CF does not support the WriteSchema option (inline XSD schema in XML file), but the Dataset class has a WriteXMLSchema and ReadXMLSchema method which can be used.
Now you can create a small database application based on local files by loading and saving XML files with data and XSD files with the relational structure.
procedure TWinForm.CreateDataset;
var
  DataTable1: DataTable;
  arrPrimKey : array[0..0] of DataColumn;
begin
  DataTable1 := Dataset1.Tables.Add('Table1');
  with DataTable1.Columns.Add('Index', typeof(Integer)) do
  begin
    Unique := True;
    AutoIncrement := True;
    AutoIncrementStep := 10;
  end;
  with DataTable1.Columns.Add('Description', typeof(String)) do
    MaxLength := 50;

  arrPrimKey[0] := DataTable1.Columns.Item['Index'];
  DataTable1.PrimaryKey := arrPrimKey;
end;

procedure TWinForm.LoadDataset;
var
  strFileName : String;
begin
  strFileName := GetExecutablePath + '\Dataset.xsd';
  if (System.IO.File.Exists(strFileName)) then
  begin
    Dataset1.ReadXMLSchema(strFileName);
    strFileName := GetExecutablePath + '\Dataset.xml';
    if (System.IO.File.Exists(strFileName)) then
      Dataset1.ReadXML(strFileName);
  end;
end;

procedure TWinForm.SaveDataset;
begin
  Dataset1.WriteXML(GetExecutablePath + '\Dataset.xml');
  Dataset1.WriteXMLSchema(GetExecutablePath + '\Dataset.xsd');
end;
DataGrid
The most easy way to display the data of a DataTable is to use a DataGrid. But when putting a DataGrid component on a form, you will get an error :
Error: E2003 Undeclared identifier: 'DataGrid'The DataGrid component also exist in the .NET CF, but it is not included in the file System.Windows.Forms.dll. It is included in the .NET CF assembly System.Windows.Forms.DataGrid.dll. So you have to refer to this assembly in your DCCIL compiler parameters.
-lu"C:\NETCFAssemblies\System.Windows.Forms.DataGrid.dll"The DataGrid component in the.NET CF does not provide rich editing capabilities, such as its .NET counterpart does. Also the DataMember property and the SetDataBinding method do not exist. Connecting the DataTable to the DataGrid.DataSource property solves the problem :
Self.DataGrid1.DataSource := Self.DataSet1.Tables['Table1'];
Conclusion
Exploring the Delphi .NET CF compiler was quite exciting. But, developing real applications for Pocket PCs with Delphi is not easy at this moment. The preview compiler works fine but without code completion and designers it is a lot of work to change the generated source code manually.
I’m looking forward to a future Delphi release with .NET CF designers or even VCL for .NET CF designers. I’m already having a lot of ideas about creating PocketPC applications.
Meanwhile, I hope to find some time to try other .NET Compact Framework features (connecting to SQL CE databases, accessing Pocket Outlook, using GPS, communication with Infrared & Bluetooth, …).